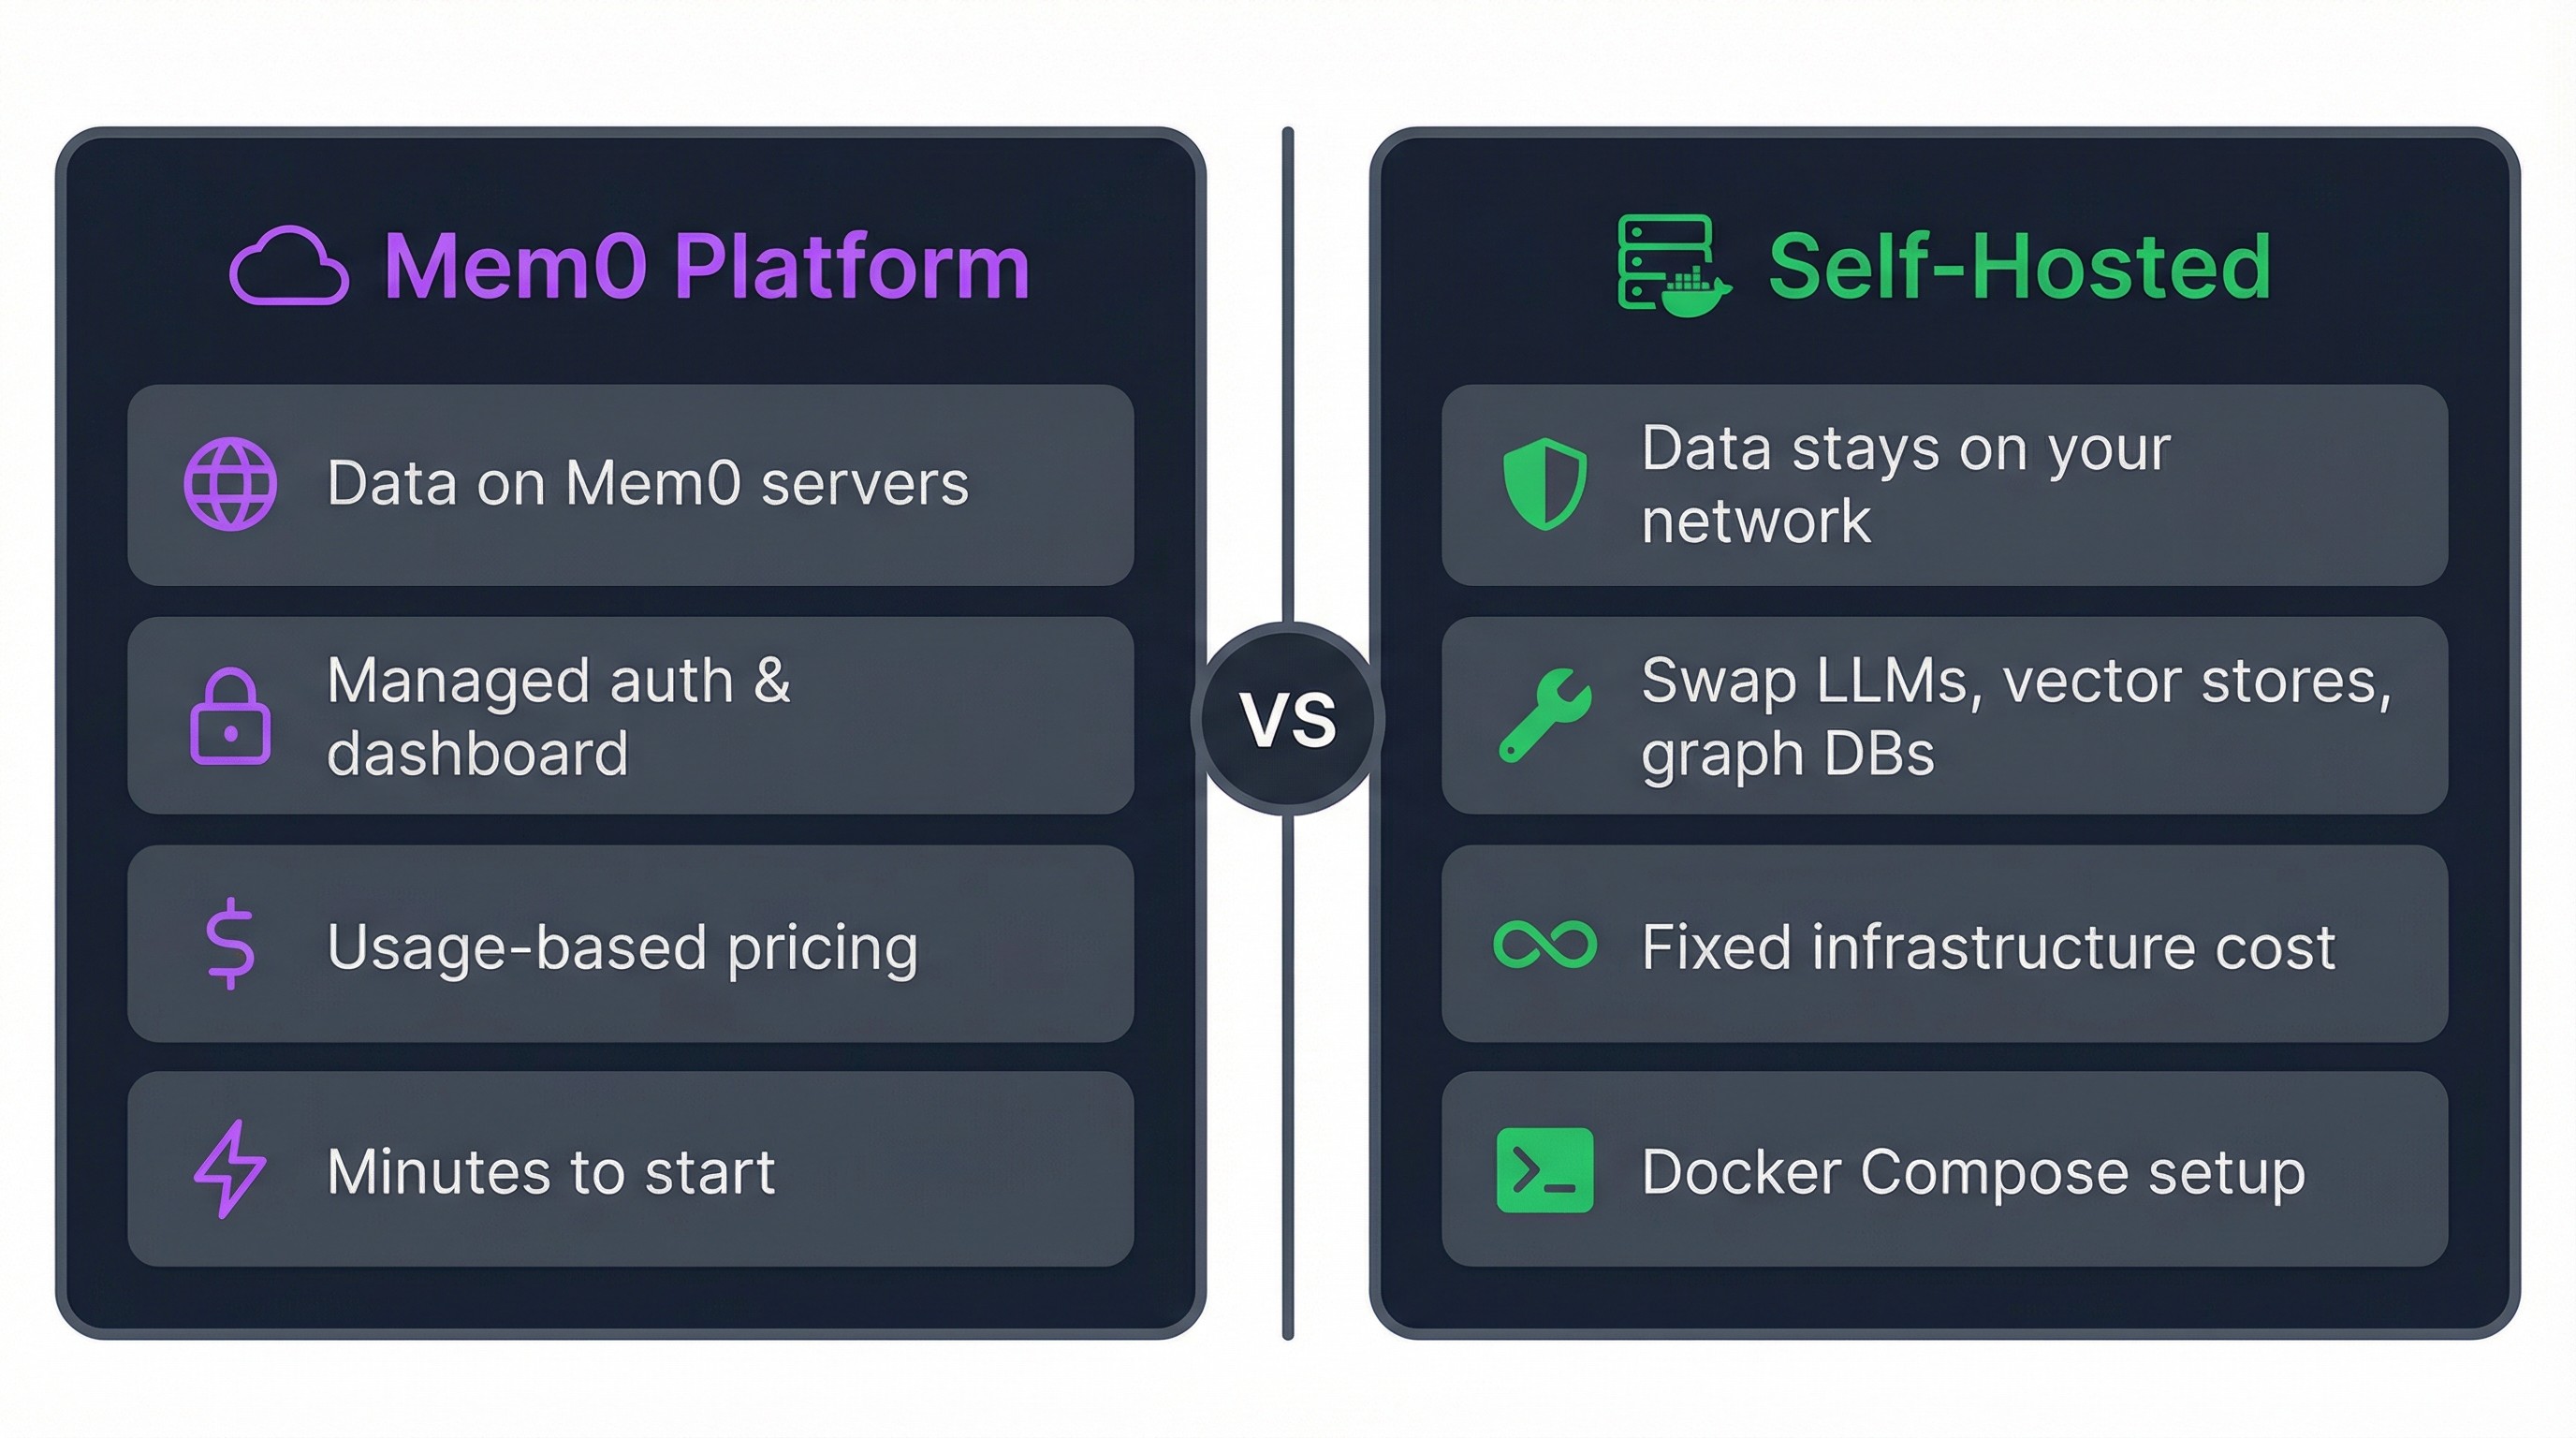
You ship an AI assistant, users love it, and then legal asks where the conversation data lives.
Nobody has a great answer when the memory layer runs on someone else's servers, priced at whatever the provider decides next quarter. Self-hosting removes the problem entirely.
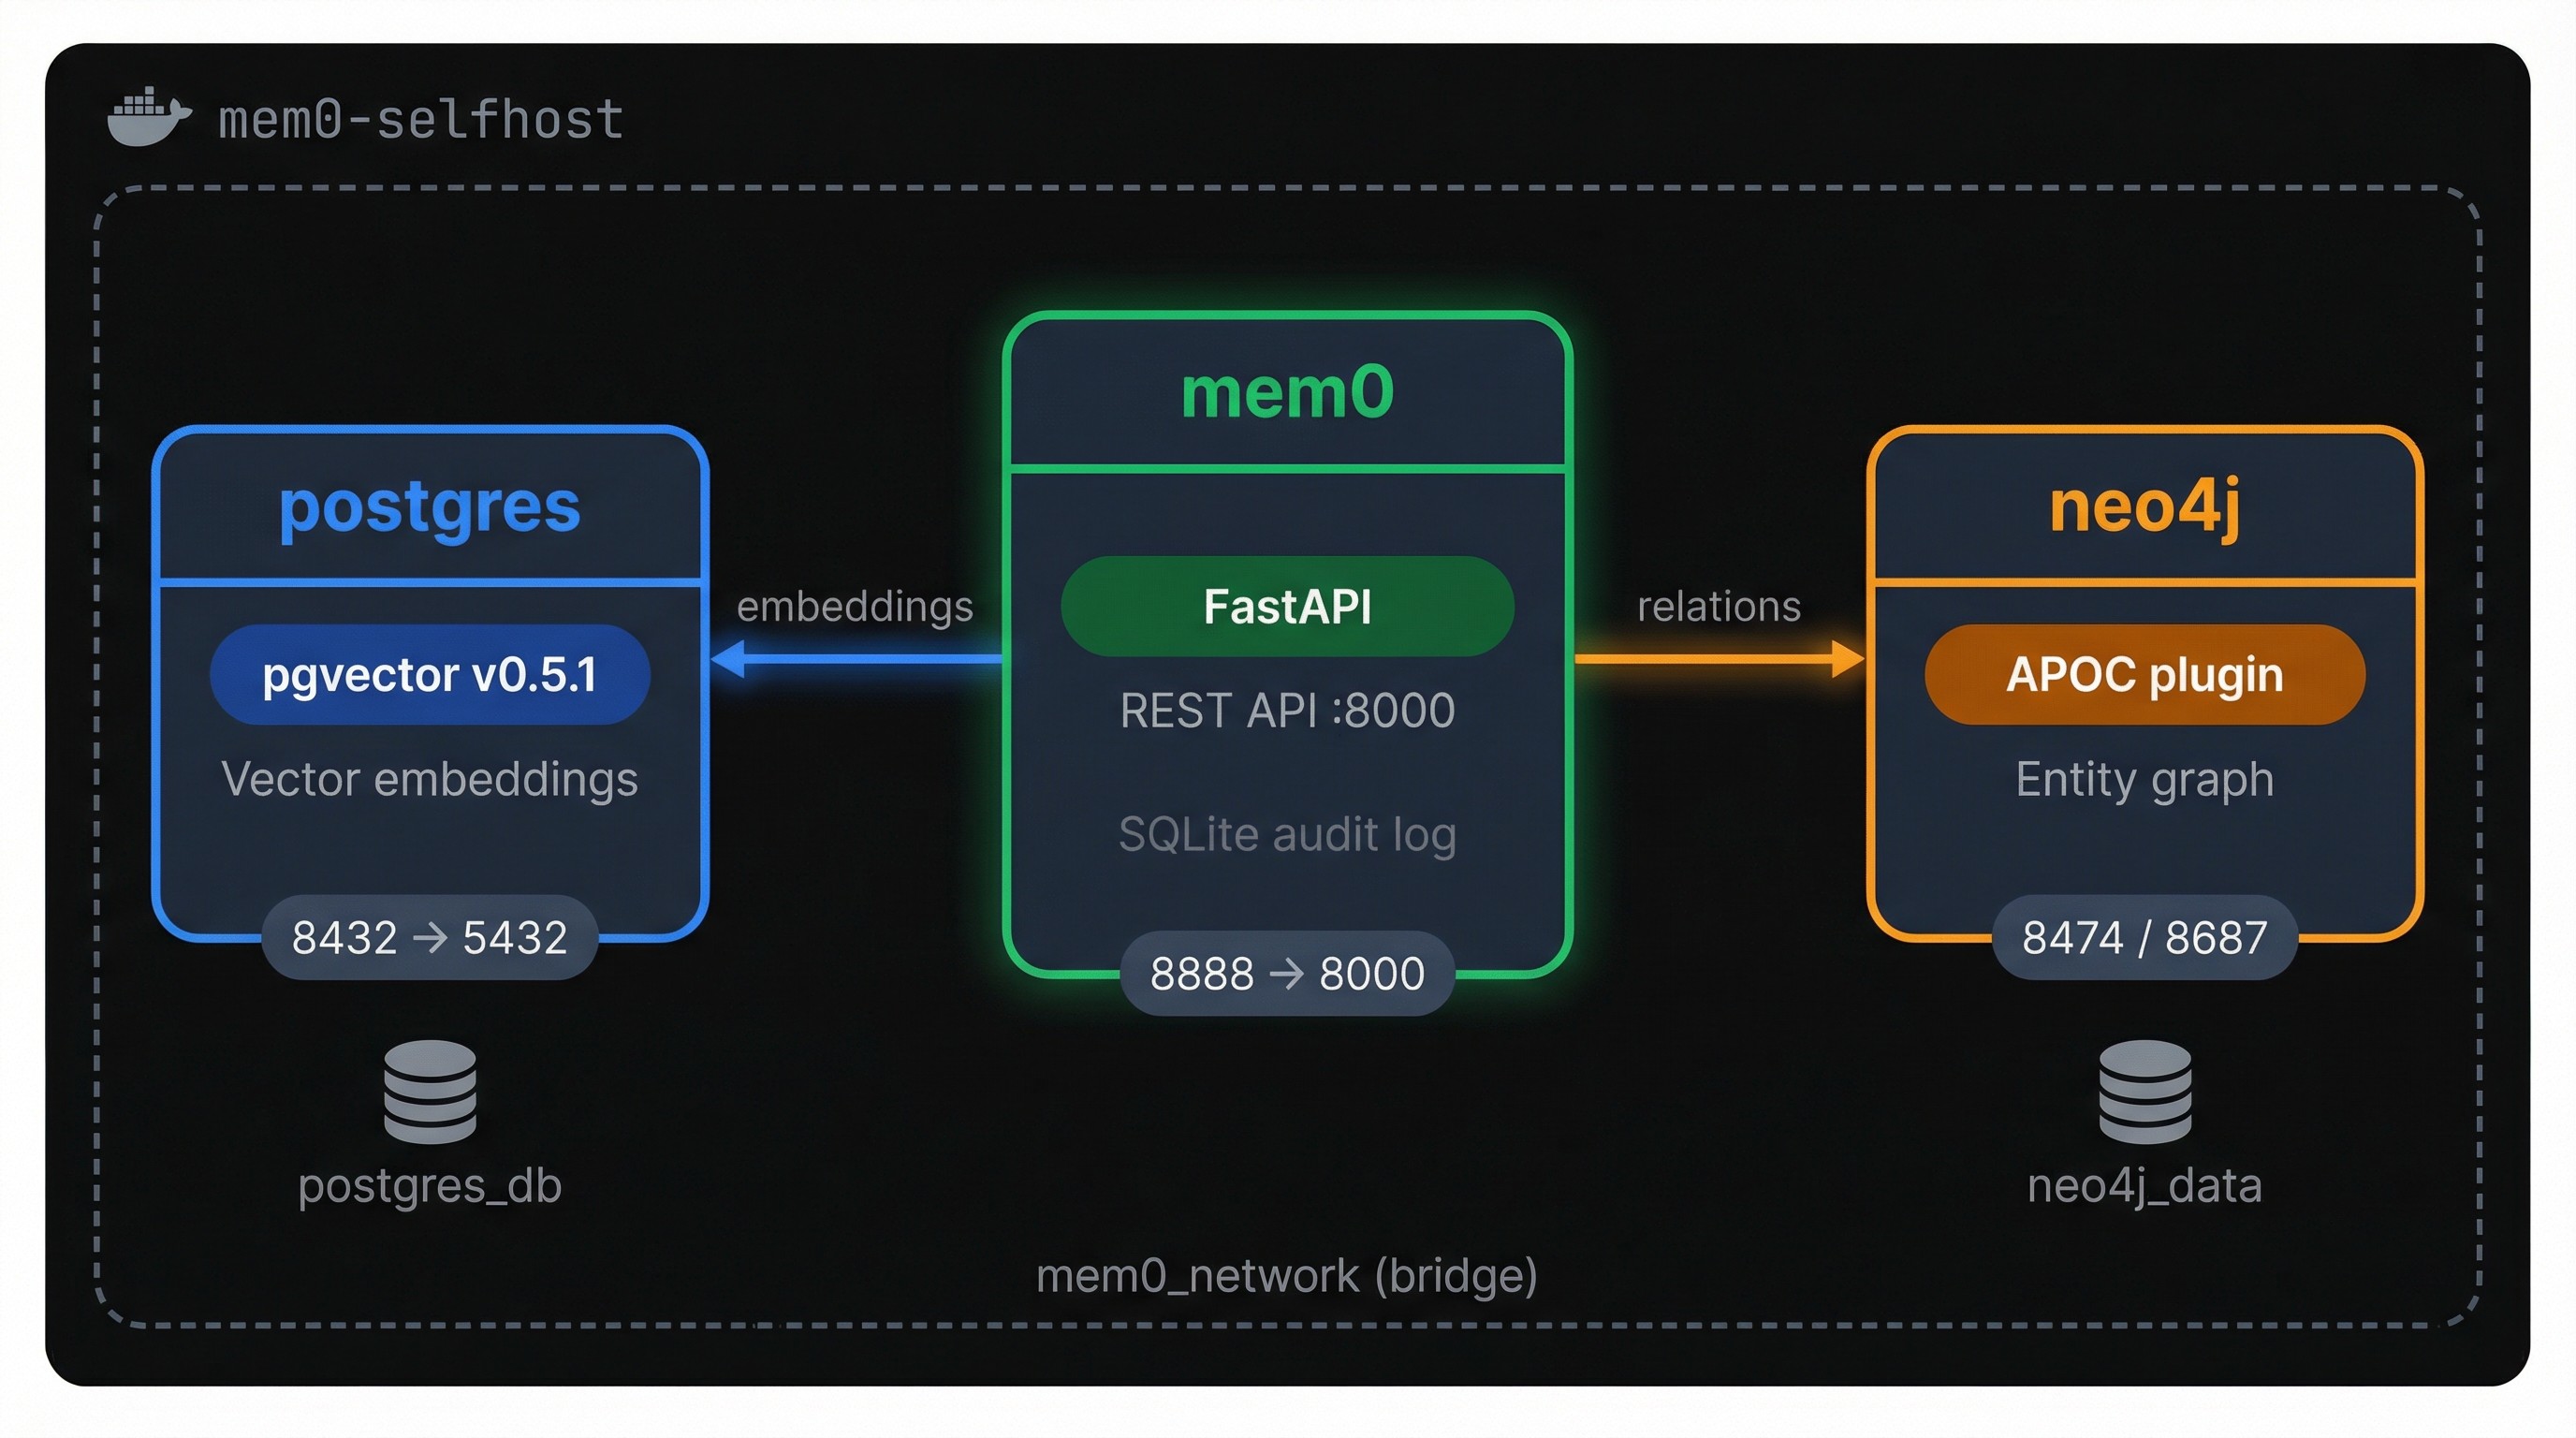
Mem0's open-source server packages the full self-hosting stack into three Docker containers: FastAPI for the REST API, PostgreSQL with pgvector for embeddings, and Neo4j for entity relationships. Everything stays on your network.
You'll go from an empty directory to a running deployment, then work through the REST API, swap in local models for offline operation, harden things for production, and deploy to AWS.
TLDR
Mem0's self-hosted stack is three Docker containers: the API server, PostgreSQL with pgvector, and Neo4j. One `docker compose up` gets you running.
The REST API handles full CRUD on memories without needing the Python SDK. Curl works fine.
Default setup is OpenAI (gpt-5-nano for extraction, text-embedding-3-small for embeddings). Swap both for Ollama models to go fully offline.
No auth and wide-open CORS by default. You'll need a reverse proxy before exposing this to any network.
Deploying the stack step by step
You don't need to clone the Mem0 repo. The whole deployment is three files in a fresh directory, and Docker handles the rest.
Prerequisites
You need Docker Desktop (which bundles Docker Compose v2) and an OpenAI API key. The default LLM and embedding model both call OpenAI, so the key is required even though everything else runs on your machine.
Setting up the files
Create a fresh directory:
mkdir -p mem0-deploy && cd mem0-deploy
mkdir -p mem0-deploy && cd mem0-deploy
mkdir -p mem0-deploy && cd mem0-deploy
You'll add three files here. First, the `.env`:
OPENAI_API_KEY=sk-your-key-here
OPENAI_API_KEY=sk-your-key-here
OPENAI_API_KEY=sk-your-key-here
Next, a `Dockerfile`:
FROM mem0/mem0-api-server:latest
RUN pip install --no-cache-dir "psycopg[binary,pool]" "mem0ai[graph]" rank-bm25 langchain-neo4j neo4j
FROM mem0/mem0-api-server:latest
RUN pip install --no-cache-dir "psycopg[binary,pool]" "mem0ai[graph]" rank-bm25 langchain-neo4j neo4j
FROM mem0/mem0-api-server:latest
RUN pip install --no-cache-dir "psycopg[binary,pool]" "mem0ai[graph]" rank-bm25 langchain-neo4j neo4j
You may encounter errors in some older versions of the self-hosted Mem0 image. In that case, you may see an `ImportError`on startup for `psycopg`, `langchain-neo4j`, and others. This Dockerfile pulls the official image and installs what's missing on top.
The third file is `docker-compose.yaml`, which wires all three services together. The full file is on this GitHub gist if you want to copy-paste it in one shot. Below, it's broken into chunks so you can see what each service does and why.
Start with the mem0 service:
name: mem0-selfhost
services:
mem0:
build: .
image: mem0-selfhost:latest
ports:
- "8888:8000"
env_file:
- .env
networks:
- mem0_network
volumes:
- ./history:/app/history
depends_on:
postgres:
condition: service_healthy
neo4j:
condition: service_healthy
environment:
- PYTHONDONTWRITEBYTECODE=1
- PYTHONUNBUFFERED=1
- POSTGRES_HOST=postgres
- POSTGRES_PORT=5432
- POSTGRES_DB=postgres
- POSTGRES_USER=postgres
- POSTGRES_PASSWORD=postgres
- NEO4J_URI=bolt:
- NEO4J_USERNAME=neo4j
- NEO4J_PASSWORD=mem0graph
`build: .` tells Compose to build from your Dockerfile instead of pulling the prebuilt image. That's how the patched dependencies make it into the container.
The `depends_on` block with `condition: service_healthy` is worth paying attention to: Compose won't start the mem0 server until both databases pass their health checks. Without it, the API tries to connect before anything is listening and crashes immediately.
The `volumes` line mounts a local `./history` directory where Mem0 writes a SQLite audit trail of every memory operation. Port `8888:8000` maps the container's internal port to 8888 on your host, which is where you'll hit the API.
  postgres:
	image: ankane/pgvector:v0.5.1
	restart: on-failure
	shm_size: "128mb"
	networks:
  	- mem0_network
	environment:
  	- POSTGRES_USER=postgres
  	- POSTGRES_PASSWORD=postgres
	healthcheck:
  	test: ["CMD", "pg_isready", "-q", "-d", "postgres", "-U", "postgres"]
  	interval: 5s
  	timeout: 5s
  	retries: 5
	volumes:
  	- postgres_db:/var/lib/postgresql/data
	ports:
  	- "8432:5432"
This isn't standard PostgreSQL. The `ankane/pgvector` image comes with the pgvector extension pre-installed, which adds vector similarity search to Postgres.
That's what Mem0 uses to store and query embeddings. The port is mapped to 8432 instead of the default 5432 so it won't collide with any Postgres instance already running on your machine. The health check runs `pg_isready` every 5 seconds, and that's what the mem0 service waits on before booting.
neo4j:
image: neo4j:5.26.4
networks:
- mem0_network
healthcheck:
test: wget -O /dev/null -q http:
interval: 1s
timeout: 10s
retries: 20
start_period: 90s
ports:
- "8474:7474"
- "8687:7687"
volumes:
- neo4j_data:/data
environment:
- NEO4J_AUTH=neo4j/mem0graph
- NEO4J_PLUGINS=["apoc"]
- NEO4J_apoc_export_file_enabled=true
- NEO4J_apoc_import_file_enabled=true
- NEO4J_apoc_import_file_use__neo4j__config=true
Neo4j handles the graph side of Mem0's memory pipeline. When the system extracts entities and relationships from memories (like "user → prefers → Python"), they land here. The `NEO4J_PLUGINS=["apoc"]` line loads the APOC plugin, a collection of utility procedures Mem0 depends on for graph operations.
Note the `start_period: 90s` in the health check. Neo4j is the slowest container to initialize, and this gives it a 90-second grace period before Compose starts counting failed checks. Two ports are exposed: 8474 for the Neo4j browser UI (handy for inspecting your graph data) and 8687 for Bolt protocol connections.
volumes:
  neo4j_data:
  postgres_db:

networks:
  mem0_network:
	driver: bridge
volumes:
  neo4j_data:
  postgres_db:

networks:
  mem0_network:
	driver: bridge
volumes:
  neo4j_data:
  postgres_db:

networks:
  mem0_network:
	driver: bridge
The named volumes persist database files on your host so memories survive container restarts. If you ever want a clean slate, `docker compose down -v` wipes them. The bridge network keeps all three containers discoverable to each other by service name.
Bringing the stack up
Build and start everything:
docker compose up -d --build
docker compose up -d --build
docker compose up -d --build
The `--build` flag tells Compose to build the image from your Dockerfile before starting. On later runs where the Dockerfile hasn't changed, you can drop it and just use `docker compose up -d`.
First run pulls three base images (~500 MB total) and installs the Python dependencies inside the mem0 container. Expect 2-5 minutes depending on your connection.
Check that all three containers are running:
docker compose ps

NAME                    	IMAGE                	STATUS                	PORTS

mem0-selfhost-mem0-1    	mem0-selfhost:latest 	Up 16 seconds         	0.0.0.0:8888->8000/tcp

mem0-selfhost-neo4j-1   	neo4j:5.26.4         	Up 26 seconds (healthy)   ...

mem0-selfhost-postgres-1	ankane/pgvector:v0.5.1   Up 26
Hit the API:
This returns a 307 redirect to `/docs`, the auto-generated OpenAPI page. Open `http://localhost:8888/docs` in a browser to see every available endpoint and test them interactively. That's the closest thing to a UI the self-hosted version has. The dashboard is platform-only.
If the mem0 container exits instead of staying up, check the logs:
docker compose logs mem0 --tail 20
docker compose logs mem0 --tail 20
docker compose logs mem0 --tail 20
Most of the time it's a missing dependency (which the custom Dockerfile should handle) or a database connection timeout. For the timeout case, give it another try. Neo4j needs that full 90-second start period on the first boot, and sometimes Compose gets impatient.
Using the self-hosted memory API
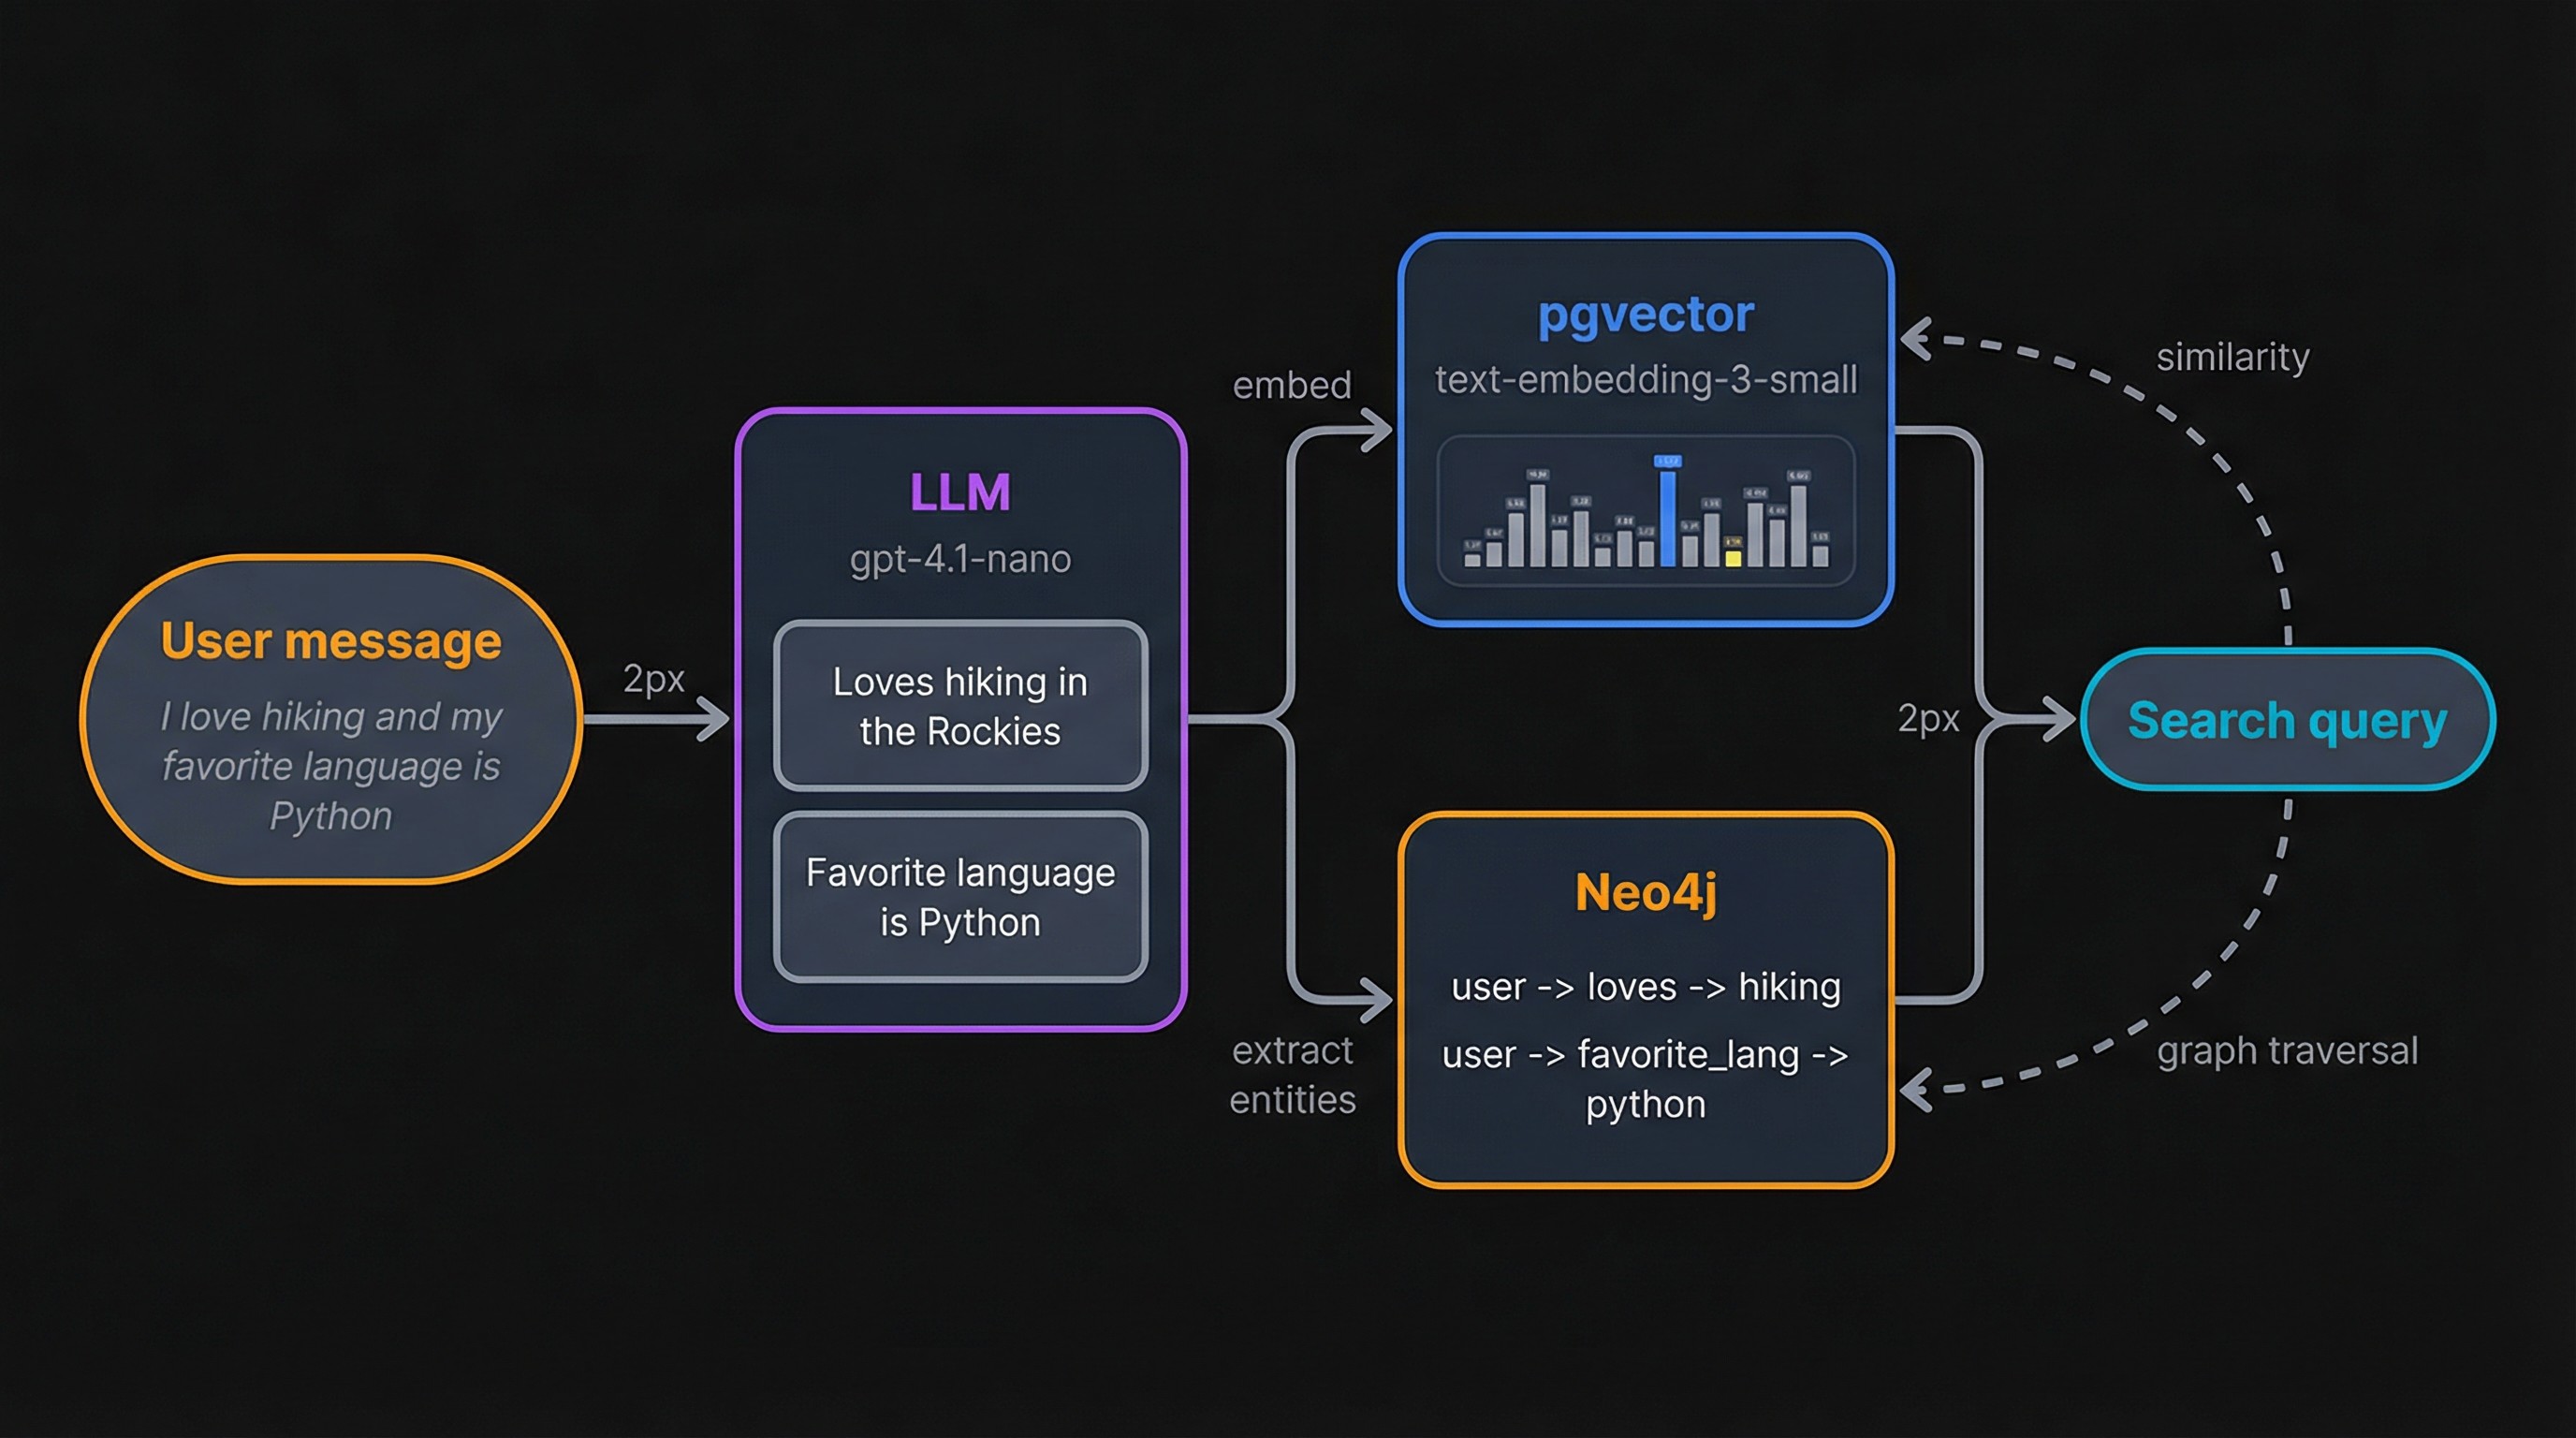
With the stack running, here's what happens when you send it data. The LLM (gpt-5-nano by default) reads your input and extracts discrete facts. Each fact gets embedded with text-embedding-3-small and stored in pgvector. At the same time, entities and relationships (like "user → prefers → Python") sync to Neo4j. Search works in reverse: your query gets embedded, pgvector returns the closest matches, and Neo4j optionally adds related entities through graph traversal.
The REST API covers the full lifecycle of a memory. Every call below hits `http://localhost:8888`.
Adding and searching memories
Add a memory by sending a message with a `user_id`:
curl -s -X POST http:
-H "Content-Type: application/json" \
-d '{
"messages": [{"role": "user", "content": "I love hiking in the Rockies and my favorite programming language is Python."}],
"user_id": "test_user"
}'curl -s -X POST http:
-H "Content-Type: application/json" \
-d '{
"messages": [{"role": "user", "content": "I love hiking in the Rockies and my favorite programming language is Python."}],
"user_id": "test_user"
}'curl -s -X POST http:
-H "Content-Type: application/json" \
-d '{
"messages": [{"role": "user", "content": "I love hiking in the Rockies and my favorite programming language is Python."}],
"user_id": "test_user"
}'Mem0 doesn't store the raw message. The LLM breaks it into individual facts and the graph store picks out entities:
{
  "results": [
	{"id": "e50ffc5f-...", "memory": "Loves hiking in the Rockies", "event": "ADD"},
	{"id": "07689942-...", "memory": "Favorite programming language is Python", "event": "ADD"}
  ],
  "relations": {
	"added_entities": [
  	[{"source": "test_user", "relationship": "loves", "target": "hiking"}],
  	[{"source": "test_user", "relationship": "hiking_location", "target": "rockies"}],
  	[{"source": "test_user", "relationship": "favorite_programming_language", "target": "python"}]
	]
  }
}
{
"results": [
{"id": "e50ffc5f-...", "memory": "Loves hiking in the Rockies", "event": "ADD"},
{"id": "07689942-...", "memory": "Favorite programming language is Python", "event": "ADD"}
],
"relations": {
"added_entities": [
[{"source": "test_user", "relationship": "loves", "target": "hiking"}],
[{"source": "test_user", "relationship": "hiking_location", "target": "rockies"}],
[{"source": "test_user", "relationship": "favorite_programming_language", "target": "python"}]
]
}
}{
"results": [
{"id": "e50ffc5f-...", "memory": "Loves hiking in the Rockies", "event": "ADD"},
{"id": "07689942-...", "memory": "Favorite programming language is Python", "event": "ADD"}
],
"relations": {
"added_entities": [
[{"source": "test_user", "relationship": "loves", "target": "hiking"}],
[{"source": "test_user", "relationship": "hiking_location", "target": "rockies"}],
[{"source": "test_user", "relationship": "favorite_programming_language", "target": "python"}]
]
}
}One input produced two memories and three graph relationships. The LLM decided "hiking in the Rockies" and "favorite language is Python" were separate facts worth storing individually.
Search is a POST to `/search` with a natural language query:
curl -s -X POST http:
-H "Content-Type: application/json" \
-d '{"query": "outdoor activities", "user_id": "test_user"}'
{
"results": [
{
"id": "e50ffc5f-...",
"memory": "Loves hiking in the Rockies",
"score": 0.62,
"user_id": "test_user"
},
{
"id": "07689942-...",
"memory": "Favorite programming language is Python",
"score": 0.92,
"user_id": "test_user"
}
]
}
```
The `score` is cosine distance between the query embedding and each stored memory. Lower means a closer match. The hiking memory scored 0.62 against "outdoor activities" while the Python memory was a weaker match at 0.92, which is exactly what you'd expect.
Listing and deleting
Fetch all memories for a user with a GET:
curl -s "http://localhost:8888/memories?user_id=test_user"
curl -s "http://localhost:8888/memories?user_id=test_user"
curl -s "http://localhost:8888/memories?user_id=test_user"
This returns the same memory objects plus their graph relations. Useful for debugging or building a user profile view.
Delete a specific memory by ID:
curl -s -X DELETE "http://localhost:8888/memories/e50ffc5f-..."

{"message": "Memory deleted successfully"}
curl -s -X DELETE "http://localhost:8888/memories/e50ffc5f-..."
{"message": "Memory deleted successfully"}curl -s -X DELETE "http://localhost:8888/memories/e50ffc5f-..."
{"message": "Memory deleted successfully"}Calling the API from Python
The most straightforward approach is plain HTTP with the `requests` library, since you already have a running REST server:
```python
import requests

BASE_URL = "http://localhost:8888"

# Add a memory
response = requests.post(f"{BASE_URL}/memories", json={
	"messages": [{"role": "user", "content": "I work at a healthcare startup and prefer PyTorch for ML projects."}],
	"user_id": "py_user"
})

for r in response.json()["results"]:
	print(f"[{r['event']}] {r['memory']}")
import requests
BASE_URL = "http://localhost:8888"
# Add a memory
response = requests.post(f"{BASE_URL}/memories", json={
"messages": [{"role": "user", "content": "I work at a healthcare startup and prefer PyTorch for ML projects."}],
"user_id": "py_user"
})
for r in response.json()["results"]:
print(f"[{r['event']}] {r['memory']}")import requests
BASE_URL = "http://localhost:8888"
# Add a memory
response = requests.post(f"{BASE_URL}/memories", json={
"messages": [{"role": "user", "content": "I work at a healthcare startup and prefer PyTorch for ML projects."}],
"user_id": "py_user"
})
for r in response.json()["results"]:
print(f"[{r['event']}] {r['memory']}")[ADD] Works at a healthcare startup
[ADD] Prefers PyTorch for ML projects
[ADD] Works at a healthcare startup
[ADD] Prefers PyTorch for ML projects
[ADD] Works at a healthcare startup
[ADD] Prefers PyTorch for ML projects
# Search
response = requests.post(f"{BASE_URL}/search", json={
	"query": "machine learning preferences",
	"user_id": "py_user"
})

for r in response.json()["results"]:
	print(f"{r['memory']} (score: {r['score']:.2f})")
# Search
response = requests.post(f"{BASE_URL}/search", json={
"query": "machine learning preferences",
"user_id": "py_user"
})
for r in response.json()["results"]:
print(f"{r['memory']} (score: {r['score']:.2f})")# Search
response = requests.post(f"{BASE_URL}/search", json={
"query": "machine learning preferences",
"user_id": "py_user"
})
for r in response.json()["results"]:
print(f"{r['memory']} (score: {r['score']:.2f})")Prefers PyTorch for ML projects (score: 0.44)
Works at a healthcare startup (score: 0.83)
Prefers PyTorch for ML projects (score: 0.44)
Works at a healthcare startup (score: 0.83)
Prefers PyTorch for ML projects (score: 0.44)
Works at a healthcare startup (score: 0.83)
If you'd rather skip the REST layer, Mem0's Python SDK also has a `Memory` class that connects directly to the backing databases. You pass it a config dict with your Postgres and Neo4j connection details, and it runs the LLM calls and embedding logic in your own process:
from mem0 import Memory

config = {
	"vector_store": {
    	"provider": "pgvector",
    	"config": {
        	"host": "localhost",
        	"port": 8432,
        	"user": "postgres",
        	"password": "postgres",
        	"dbname": "postgres",
    	},
	},
	"graph_store": {
    	"provider": "neo4j",
    	"config": {
        	"url": "bolt://localhost:8687",
        	"username": "neo4j",
        	"password": "mem0graph",
    	},
	},
}

memory = Memory.from_config(config)
memory.add("Prefers VS Code for Python development", user_id="py_user")
results = memory.search("coding tools", user_id="py_user")
from mem0 import Memory
config = {
"vector_store": {
"provider": "pgvector",
"config": {
"host": "localhost",
"port": 8432,
"user": "postgres",
"password": "postgres",
"dbname": "postgres",
},
},
"graph_store": {
"provider": "neo4j",
"config": {
"url": "bolt://localhost:8687",
"username": "neo4j",
"password": "mem0graph",
},
},
}
memory = Memory.from_config(config)
memory.add("Prefers VS Code for Python development", user_id="py_user")
results = memory.search("coding tools", user_id="py_user")from mem0 import Memory
config = {
"vector_store": {
"provider": "pgvector",
"config": {
"host": "localhost",
"port": 8432,
"user": "postgres",
"password": "postgres",
"dbname": "postgres",
},
},
"graph_store": {
"provider": "neo4j",
"config": {
"url": "bolt://localhost:8687",
"username": "neo4j",
"password": "mem0graph",
},
},
}
memory = Memory.from_config(config)
memory.add("Prefers VS Code for Python development", user_id="py_user")
results = memory.search("coding tools", user_id="py_user")Both approaches hit the same underlying data. The REST path is language-agnostic and keeps your application code decoupled from Mem0's internals. The `Memory` class gives you tighter integration but ties you to Python and the `mem0ai` package.
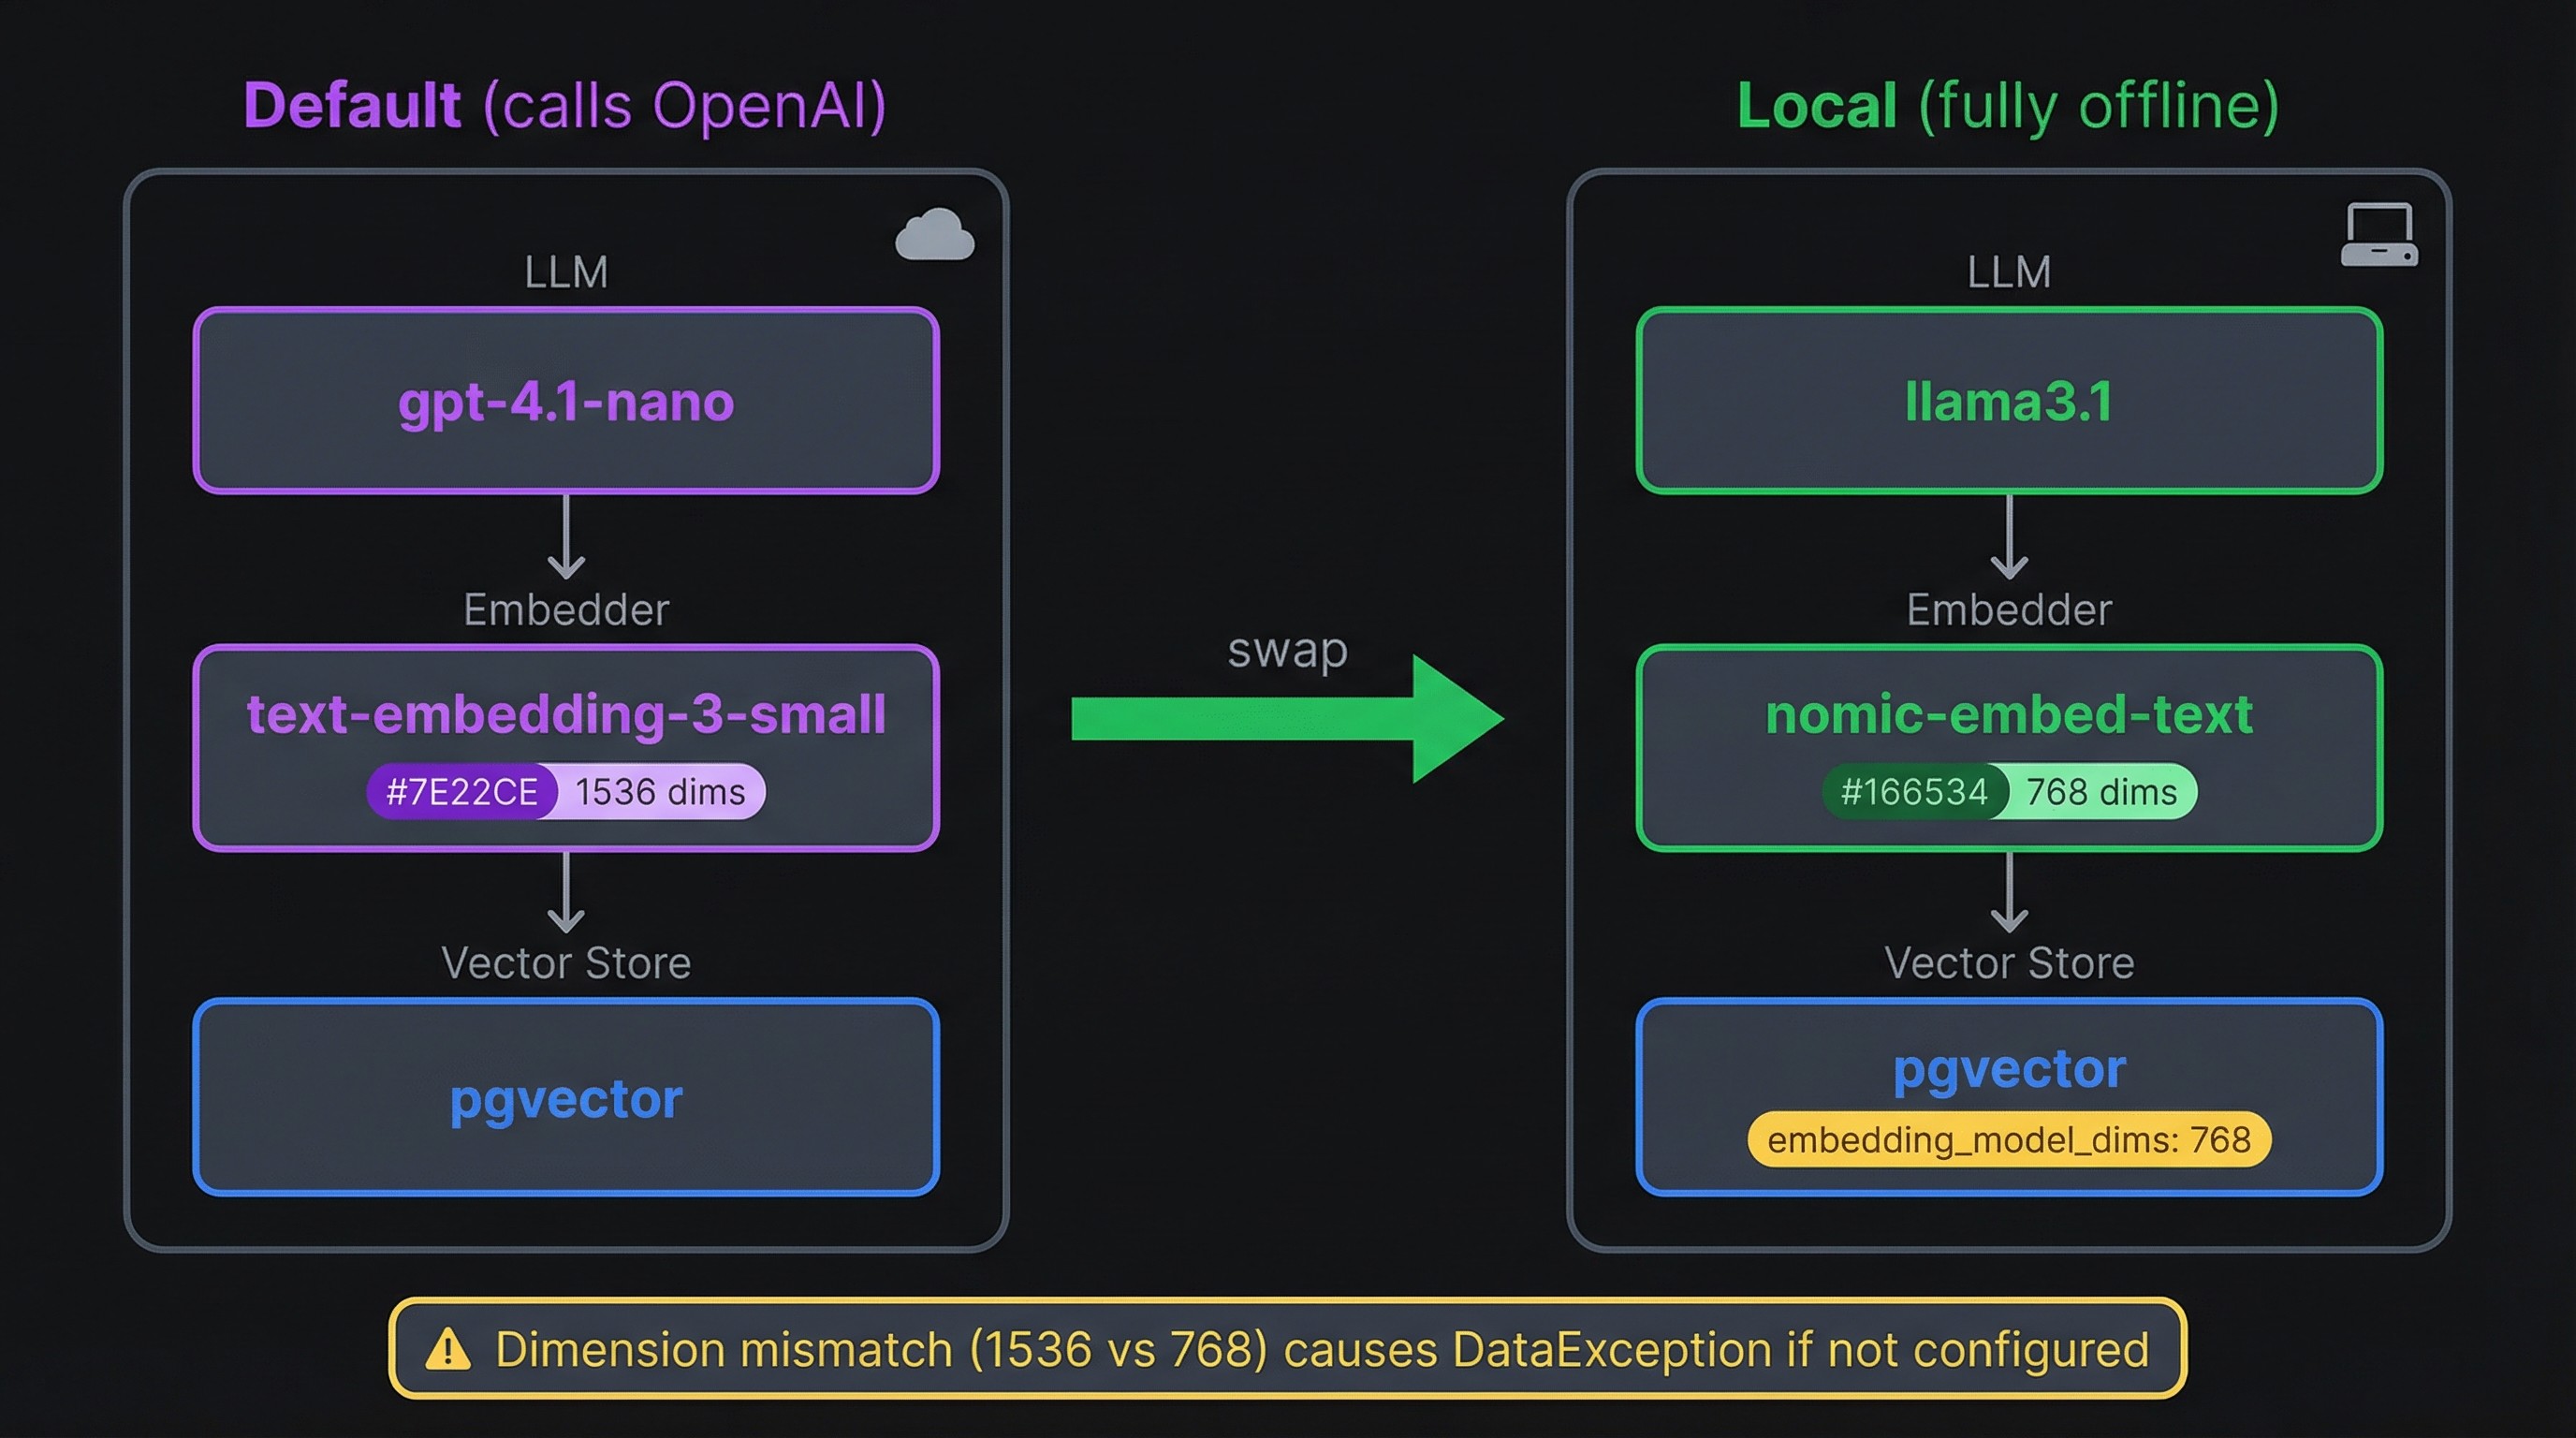
Swapping components for a fully local setup
The default configuration calls OpenAI for every memory operation. If your whole reason for self-hosting is keeping data off external servers, that's a problem. You can replace both the LLM and the embedding model with local alternatives through Ollama.
Going offline with Ollama
You'll need Ollama installed and two models pulled:
ollama pull llama3.1
ollama pull nomic-embed-text
ollama pull llama3.1
ollama pull nomic-embed-text
ollama pull llama3.1
ollama pull nomic-embed-text
Then pass a config dict to `Memory.from_config()` that points both the LLM and embedder at your local Ollama instance:
```python
from mem0 import Memory

config = {
	"llm": {
    	"provider": "ollama",
    	"config": {
        	"model": "llama3.1",
        	"temperature": 0,
        	"max_tokens": 2000,
        	"ollama_base_url": "http://localhost:11434",
    	},
	},
	"embedder": {
    	"provider": "ollama",
    	"config": {
        	"model": "nomic-embed-text:latest",
        	"ollama_base_url": "http://localhost:11434",
    	},
	},
	"vector_store": {
    	"provider": "pgvector",
    	"config": {
        	"host": "localhost",
        	"port": 8432,
        	"user": "postgres",
        	"password": "postgres",
        	"dbname": "postgres",
        	"embedding_model_dims": 768,
    	},
	},
	"graph_store": {
    	"provider": "neo4j",
    	"config": {
        	"url": "bolt://localhost:8687",
        	"username": "neo4j",
        	"password": "mem0graph",
    	},
	},
}

memory = Memory.from_config(config)

result = memory.add(
	"I'm a backend engineer who primarily works with Go and PostgreSQL.",
	user_id="ollama_user",
)
for r in result["results"]:
	print(f"[{r['event']}] {r['memory']}")
from mem0 import Memory
config = {
"llm": {
"provider": "ollama",
"config": {
"model": "llama3.1",
"temperature": 0,
"max_tokens": 2000,
"ollama_base_url": "http://localhost:11434",
},
},
"embedder": {
"provider": "ollama",
"config": {
"model": "nomic-embed-text:latest",
"ollama_base_url": "http://localhost:11434",
},
},
"vector_store": {
"provider": "pgvector",
"config": {
"host": "localhost",
"port": 8432,
"user": "postgres",
"password": "postgres",
"dbname": "postgres",
"embedding_model_dims": 768,
},
},
"graph_store": {
"provider": "neo4j",
"config": {
"url": "bolt://localhost:8687",
"username": "neo4j",
"password": "mem0graph",
},
},
}
memory = Memory.from_config(config)
result = memory.add(
"I'm a backend engineer who primarily works with Go and PostgreSQL.",
user_id="ollama_user",
)
for r in result["results"]:
print(f"[{r['event']}] {r['memory']}")from mem0 import Memory
config = {
"llm": {
"provider": "ollama",
"config": {
"model": "llama3.1",
"temperature": 0,
"max_tokens": 2000,
"ollama_base_url": "http://localhost:11434",
},
},
"embedder": {
"provider": "ollama",
"config": {
"model": "nomic-embed-text:latest",
"ollama_base_url": "http://localhost:11434",
},
},
"vector_store": {
"provider": "pgvector",
"config": {
"host": "localhost",
"port": 8432,
"user": "postgres",
"password": "postgres",
"dbname": "postgres",
"embedding_model_dims": 768,
},
},
"graph_store": {
"provider": "neo4j",
"config": {
"url": "bolt://localhost:8687",
"username": "neo4j",
"password": "mem0graph",
},
},
}
memory = Memory.from_config(config)
result = memory.add(
"I'm a backend engineer who primarily works with Go and PostgreSQL.",
user_id="ollama_user",
)
for r in result["results"]:
print(f"[{r['event']}] {r['memory']}")[ADD] Works as a backend engineer
[ADD] Primarily works with Go and PostgreSQL
[ADD] Works as a backend engineer
[ADD] Primarily works with Go and PostgreSQL
[ADD] Works as a backend engineer
[ADD] Primarily works with Go and PostgreSQL
results = memory.search("programming languages", user_id="ollama_user")
for r in results["results"]:
	print(f"{r['memory']} (score: {r['score']:.2f})")
results = memory.search("programming languages", user_id="ollama_user")
for r in results["results"]:
print(f"{r['memory']} (score: {r['score']:.2f})")results = memory.search("programming languages", user_id="ollama_user")
for r in results["results"]:
print(f"{r['memory']} (score: {r['score']:.2f})")Primarily works with Go and PostgreSQL (score: 0.45)
Works as a backend engineer (score: 0.78)
Primarily works with Go and PostgreSQL (score: 0.45)
Works as a backend engineer (score: 0.78)
Primarily works with Go and PostgreSQL (score: 0.45)
Works as a backend engineer (score: 0.78)
Notice the `embedding_model_dims: 768` in the vector store config. That line is easy to miss and hard to debug without it. OpenAI's text-embedding-3-small produces 1536-dimensional vectors, which is what pgvector defaults to. Nomic-embed-text produces 768-dimensional vectors. If the dimensions don't match, pgvector throws a `DataException: expected 1536 dimensions, not 768` error on every insert. Setting `embedding_model_dims` tells Mem0 to create the table with the right column size.
One catch: if you already have data stored with OpenAI embeddings, you can't just swap the embedder in place. The existing vectors are 1536-dimensional and the new ones would be 768. You'd need to wipe the vector store (`docker compose down -v`) and re-add your memories with the new model.
Alternative vector and graph stores
Mem0 supports over 20 vector store backends beyond pgvector, including Qdrant, ChromaDB, Milvus, and Pinecone. On the graph side, you can swap Neo4j for Memgraph. Each swap is a config dict change. The Mem0 docs list every supported provider and its config options.
Hardening for production
The default stack is designed for local development. Before it touches a real network, a few things need to change.
All three services bind to `0.0.0.0` by default, meaning any device on the network can reach Postgres, Neo4j, and the API directly. In the compose file, prefix each host port with `127.0.0.1` (e.g., `127.0.0.1:8888:8000`). This locks every port to localhost. The only port that should face the outside world is the one served by a reverse proxy.
On that note, Mem0 ships with no authentication and its CORS policy is `allow_origins=["*"]`. You need a reverse proxy in front of the mem0 service. Caddy is the lowest-friction option here since it handles Let's Encrypt certificates automatically with minimal config. Nginx and Traefik both work too. API key or OAuth2 authentication should live at the proxy layer, because Mem0 has no auth middleware of its own. A Caddy setup with a `reverse_proxy localhost:8888` directive and a domain name gets you TLS and a single entry point in about five lines of config.
The compose file also has passwords hardcoded in plain text (`postgres`, `mem0graph`). Move all credentials into your `.env` file and reference them with `${VARIABLE}` syntax in the YAML. Generate strong values with `openssl rand -base64 32` and add `.env` to `.gitignore`. For Docker Swarm or Kubernetes, use Docker secrets or a vault service instead of environment variables.
Here's what those changes look like on the mem0 service, along with resource limits, a restart policy, and log rotation:
# Partial — merge these into your existing service config
services:
  mem0:
	ports:
  	- "127.0.0.1:8888:8000"
	environment:
  	- POSTGRES_PASSWORD=${POSTGRES_PASSWORD}
  	- NEO4J_PASSWORD=${NEO4J_PASSWORD}
	restart: unless-stopped
	deploy:
  	resources:
    	limits:
      	memory: 512M
      	cpus: "1.0"
	logging:
  	driver: "json-file"
  	options:
    	max-size: "10m"
    	max-file: "5"
# Partial — merge these into your existing service config
services:
mem0:
ports:
- "127.0.0.1:8888:8000"
environment:
- POSTGRES_PASSWORD=${POSTGRES_PASSWORD}
- NEO4J_PASSWORD=${NEO4J_PASSWORD}
restart: unless-stopped
deploy:
resources:
limits:
memory: 512M
cpus: "1.0"
logging:
driver: "json-file"
options:
max-size: "10m"
max-file: "5"# Partial — merge these into your existing service config
services:
mem0:
ports:
- "127.0.0.1:8888:8000"
environment:
- POSTGRES_PASSWORD=${POSTGRES_PASSWORD}
- NEO4J_PASSWORD=${NEO4J_PASSWORD}
restart: unless-stopped
deploy:
resources:
limits:
memory: 512M
cpus: "1.0"
logging:
driver: "json-file"
options:
max-size: "10m"
max-file: "5"Apply the same pattern to the postgres and neo4j services. Neo4j is the heaviest container, so give it a higher memory limit (around 2 GB). Without resource limits, one container can consume all available memory and starve the others.
Named volumes keep your data alive across container restarts, but volumes are not backups. Schedule `pg_dump` through a cron job for Postgres (it runs against a live database). Neo4j Community edition's `neo4j-admin database dump` requires stopping the container first, so volume-level snapshots are more practical for zero-downtime backups. If you're running on AWS, scheduled EBS snapshots handle both databases at once.
Deploying to AWS from the CLI
The local stack translates to a cloud server with almost no changes. EC2 is the most direct path since you're running the same `docker compose up` on a remote machine instead of your laptop.
A t3.medium instance (2 vCPU, 4 GB RAM, ~$30/month on-demand) is the minimum for Neo4j + pgvector + the API server running side by side. If you expect steady traffic or want room for Ollama models, a t3.large (8 GB RAM) gives more headroom.
Launch an instance with Amazon Linux 2023 or Ubuntu and a security group that allows only SSH (port 22, restricted to your IP) and HTTPS (port 443). Then SSH in and install Docker:
# Amazon Linux 2023
sudo yum install -y docker
sudo systemctl enable --now docker
sudo usermod -aG docker $USER
newgrp docker # activates the group without requiring a full logout
# Install Compose plugin
sudo mkdir -p /usr/local/lib/docker/cli-plugins
sudo curl -SL https:
-o /usr/local/lib/docker/cli-plugins/docker-compose
sudo chmod +x /usr/local/lib/docker/cli-plugins/docker-compose
Copy your three files (`.env`, `Dockerfile`, `docker-compose.yaml`) to the instance with `scp` or pull them from a private repo. Then bring the stack up the same way you did locally:
docker compose up -d --build
curl -s http:
docker compose up -d --build
curl -s http:
docker compose up -d --build
curl -s http:
With the security group locked to ports 22 and 443, Postgres (8432) and Neo4j (8474, 8687) stay unreachable from the outside. The compose network handles service-to-service traffic internally, and only the reverse proxy (Caddy or nginx on port 443) faces the internet.
For persistent storage, Docker volumes live on the instance's root EBS volume by default. That's fine for getting started, but a dedicated EBS volume mounted at `/var/lib/docker/volumes` gives you independent snapshots and the ability to resize storage without touching the OS disk. Schedule EBS snapshots through AWS Backup or a cron job calling the AWS CLI.
If you'd rather have AWS manage the orchestration, Elastic Beanstalk accepts a `docker-compose.yaml` directly as a deployment artifact. ECS with Fargate is another option, though it's designed for stateless containers. The stateful databases (pgvector, Neo4j) with their persistent volume requirements make Fargate awkward compared to a straightforward EC2 instance.
Deploy and own your memory stack
You now have a three-container memory system with a REST API, vector search, and a knowledge graph, all running on your infrastructure. With the hardening steps applied and the stack on EC2, it's ready for real traffic behind a reverse proxy.
If your use case is personal rather than server-side, OpenMemory MCP is worth a look. It runs Mem0 as a local MCP server that gives memory to coding tools like Cursor and Claude Desktop without needing a cloud deployment.
For the full list of supported vector stores, graph backends, LLM providers, and config options, see the Mem0 open-source docs.


